A VPN for the Homelab

In this post I will detail how I setup a working Wireguard VPN to access my Fedora homelab server. I will connect to the VPN using my Chromebook connected to a Google Fi hotspot served by my phone. I will also utilize the PiHole DNS server on the homelab through the VPN.
A few gotchas include potential default MTU incompatibility, and a picky native VPN app on Chromebook. Read on.
Environment
Our environment includes:
- (Homelab Server) Fedora Linux 42 (Workstation Edition)
- Runs PiHole and a number of HTTPS services
- Standard TP-Link Router
- Spectrum Internet with a private IP ( does not use Carrier-Grade NAT (CGNAT) )
- Pixel 7 with Google Fi
- Lenovo Chromebook running ChromeOS 135
Wireguard "server" setup
Technically Wireguard is considered serverless, and each connection is called a "peer". However, in this particular setup, we will be listening for VPN connections only on our homelab server.
For setup, I opted to using the native NetworkManager integration with Wireguard. The reasoning is simply keeping
network profiles managed through one system.
This process is well documented at https://docs.redhat.com/en/documentation/red_hat_enterprise_linux/9/html/configuring_and_managing_networking/assembly_setting-up-a-wireguard-vpn_configuring-and-managing-networking. However, for thoroughness I will document the steps here.
Generate Keys
First we will login to the sudoers shell, install wireguard-tools, generate a private and public key, and set the
correct permissions on those files.
This is not unlike generating SSH keys, where the public key is shared to peers.
sudo -s
dnf install wireguard-tools
wg genkey | tee /etc/wireguard/$HOSTNAME.private.key | wg pubkey > /etc/wireguard/$HOSTNAME.public.key
chmod 600 /etc/wireguard/$HOSTNAME.private.key /etc/wireguard/$HOSTNAME.public.key
We will use these keys in later steps.
Keep these keys secret and safe.
Create Wireguard Profile
Now we will create a new wireguard profile in NetworkManager using nmcli,
set its IPv4 and IPv6 addresses, set its wireguard private key, and define
the port which we will listen to VPN connections through.
nmcli connection add type wireguard con-name server-wg0 ifname wg0 autoconnect no
nmcli connection modify server-wg0 ipv4.method manual ipv4.addresses 192.0.2.1/24
nmcli connection modify server-wg0 ipv6.method manual ipv6.addresses 2001:db8:1::1/32
nmcli connection modify server-wg0 wireguard.private-key $(cat /etc/wireguard/$HOSTNAME.private.key)
nmcli connection modify server-wg0 wireguard.listen-port 51820
This new profile will remain unconnected (autoconnect no) until we finalize setup.
This new profile is saved to a file located at /etc/NetworkManager/system-connections/server-wg0.nmconnection
Setting the MTU
One difference between NetworkManager's Wireguard integration and that of using wg-quick is that it does not take care of setting
an appropriate MTU (Maximum Transmission Unit) for packets.
This potentially has impactful consequences over a limited network.
The algorithm wg-quick up uses iterates through
relevant devices on your network and picks the lowest set MTU. Since wireguard introduces overhead to packets, it will set the final MTU to
(lowest device MTU) - 80.
The popular default MTU for devices is 1500. So if the algorithm fails, it picks a safe MTU of 1420.
For our general case, and our utilization of a large limited public network (Google Fi mobile), we will stick with the safe MTU:
nmcli connection modify server-wg0 wireguard.mtu 1420
If you suspect issues with the MTU and dropped packets, see the #troubleshooting section.
Firewall
We will need to allow our listening port through the firewall on the specific zone that our internet-facing interface is assigned to.
In the RedHat instructions above, that was the Public zone. But in my particular case, the Public zone was not active, and my interface was assigned to the FedoraServer zone.
Using nmcli and firewall-cmd we can confirm what zone we need to open the port on:
nmcli device

DEVICE           TYPE       STATE                   CONNECTION
bridge0          bridge     connected               bridge0
wg0              wireguard  connected               server-wg0
enp1s0           ethernet   connected               enp1s0
We can see our Wired internet-facing ethernet connection's interface is enp1s0. Let's find the appropriate zone:
firewall-cmd --get-zone-of-interface=enp1s0
FedoraServer

firewall-cmd --list-all  --zone=FedoraServer
FedoraServer (default, active)
  target: default
  ingress-priority: 0
  egress-priority: 0
  icmp-block-inversion: no
  interfaces: bridge0 enp1s0
  sources:
  services: cockpit dhcpv6-client glances nfs ssh
  ports: 61208/tcp 10000/udp
  protocols:
  forward: yes
  masquerade: no
  forward-ports:
  source-ports:
  icmp-blocks:
  rich rules:
We see our zone is FedoraServer and we confirm that the enp1s0 interface is connected to it and we confirm that
the zone is active.
Let's go ahead and open the port, and set it to be permanent so it persists on reloads:
firewall-cmd --add-port=51820/udp --zone=FedoraServer --permanent
We should also assign our Wireguard interface to the public zone, so that we can have control over traffic sent.
nmcli connection modify server-wg0 connection.zone public
Router
Router setup simply involved setting up port-forwarding for the listening port (UDP 51820) to the IP address of the homelab server.
Chromebook Peer Setup
Chromebook has its own native VPN software that is a little less-than-intuitive.
Before proceeding, I would recommend having the Chromebook connected to the local network and to SSH into the Homelab.
This way you can quickly cat /etc/wireguard/$HOSTNAME.public.key in the SSH terminal and copy/paste the key into the VPN UI described below.
This avoids any tedious and potentially inaccurate typing.
ssh homelab.local.network
sudo -s
cat /etc/wireguard/$HOSTNAME.public.key
oS0mQplCAG4TYj6l9jbCZHn55e3tcyla6kPe4LvQHSA=
VPN Configuration
To access the VPN settings:
- click the time at the bottom-right
- the gearbox for settings interface
- then the "Network" option on the left sidebar
- "add connection" -> "add built-in VPN..."
We are now presented with a form, that has a very specific validation algorithm before the "Connect" button will enable and turn blue.
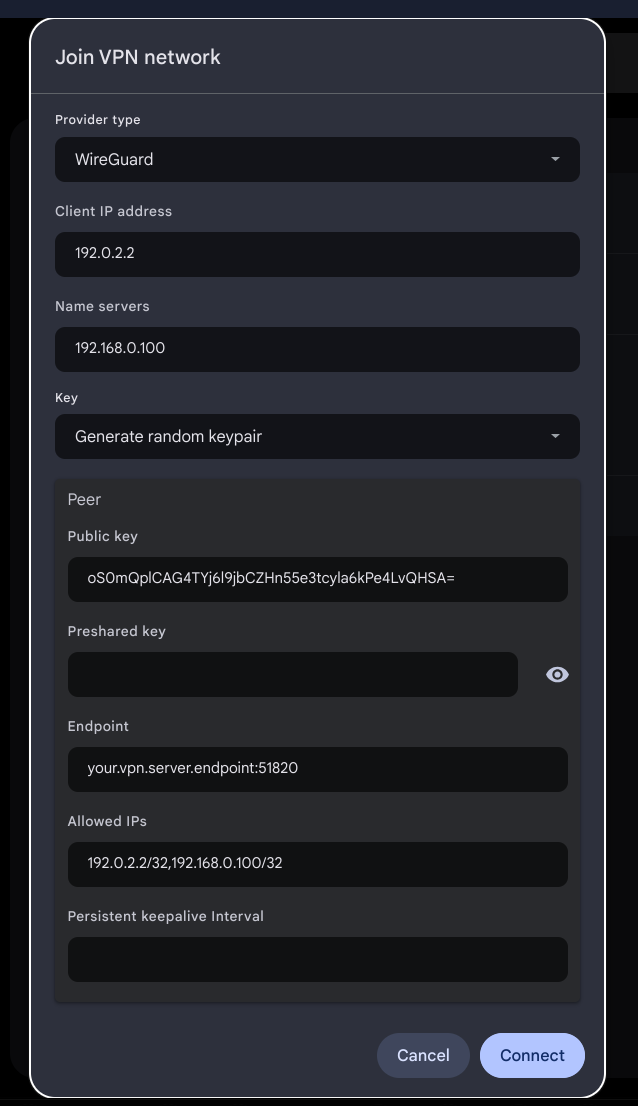
Settings:
Service Name:  Homelab VPN
Provider type: Wireguard
Client IP Address:  192.0.2.2

`# The address of our Homelab's PiHole DNS server on the local network.`
Name servers:  192.168.0.100


`# The Chromebook's public key will be available in the connection's settings after it is saved`
Key:  Generate random keypair

Peer

`# Utilize the cat /etc/wireguard/$HOSTNAME.public.key from your SSH terminal and copy/paste here`
Public Key:  oS0mQplCAG4TYj6l9jbCZHn55e3tcyla6kPe4LvQHSA=

`# Optional. Leave blank unless higher security desired.  See wireguard documentation.`
`# After saving, ChromeOS appears to autofill this field, masked by astericks, `
`# but it does not seem to make a difference.`
Preshared Key:

`# This will be your public facing IP address or FQDN, with the listening port `
`# (51820 in our example)`
Endpoint:  your.vpn.server.endpoint:51820

`# This field specifies addresses assigned to communicate TO and FROM our wireguard peer`
`# (in our case, the server)`
`#  A subnet mask is required for the form to validate and enable the Connect button.`
`#  We use /32 to designate one specific address`
`#  We assign the servers VPN address (192.0.2.2) and our PiHole DNS address (192.168.0.100).`
`#  Without the PiHole address, our Chromebook won't be able to access the nameserver.`
Allowed IPs: 192.0.2.2/32,192.168.0.100/32

`# Optional.  Specify number in seconds to send keepalive packets if your network requires it.`
Persistent keepalive Interval:
The Connect button should now enable and turn blue. Go ahead and click it to save the connection.
Add Peer to Server config
Unfortunately as of this writing we cannot use nmcli to add peers to our wireguard profile ( issue #358 ). So we will need to manually edit the config file and refresh the profile.
Lets utilize the copy/paste function of our Chromebook's public key. Go ahead and click on the newly created Homelab VPN connection.
You will be presented with the public key in the VPN's profile page. Copy it:
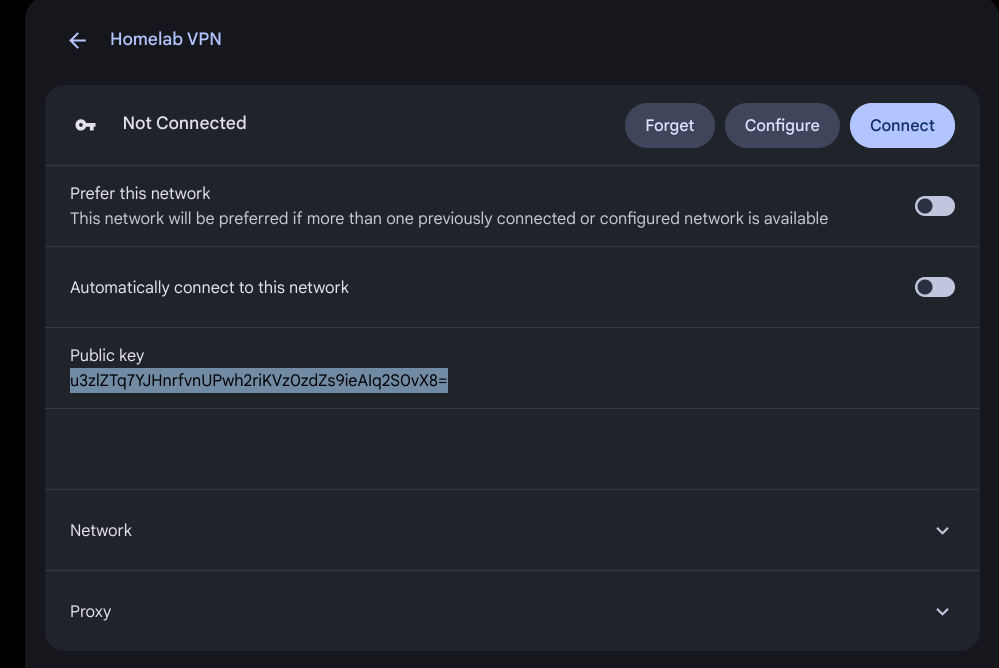
SSH into our Homelab and append our newly created peer to the wireguard profile:
ssh homelab.local.network
sudo -s
cat >> /etc/NetworkManager/system-connections/server-wg0.nmconnection << EOF

[wireguard-peer.u3zlZTq7YJHnrfvnUPwh2riKVz0zdZs9ieAIq2S0vX8=]
# chromebook
allowed-ips=192.0.2.2/32;
EOF
And now we set the profile to autoconnect, reload the profile and start the wireguard VPN:
nmcli connection modify server-wg0 autoconnect yes
nmcli connection reload
nmcli connection up server-wg0
Connection successfully activated (D-Bus active path: /org/freedesktop/NetworkManager/ActiveConnection/30)
Testing the connection
With our Wireguard server activated, we should now activate the connection on our Chromebook and send some packets.
First, lets disconnect from our local network first:
- Ensure Phone has Wifi off and the hotspot is activated. Making sure all traffic is through the Google Fi connection
- Disconnect chromebook from local network and connect to the phone hotspot
- Enable the newly created VPN on the Chromebook
Typical testing might include trying to access services from your Homelab, such as an HTTP site or SSH.
But for a more technical approach, try the following:
On the server, we need to temporarily open a port on our firewall for our Wireguard interface. (Ensure you have added the Wireguard interface to the public zone on your firewall as mentioned in the firewall section)
firewall-cmd --add-port=2222/tcp --zone=public
On the Wirelab server, lets listen for packets using ncat.
nc -vvlnp 2222
Ncat: Version 7.92 ( https://nmap.org/ncat )
Ncat: Listening on :::2222
Ncat: Listening on 0.0.0.0:2222
Lets send some packets using our penguin linux terminal on our Chromebook:
dd if=/dev/zero bs=1024k count=1024 | nc -v 192.0.2.1 2222
On our server, we see a new connection:
Ncat: Connection from 192.0.2.2.
Ncat: Connection from 192.0.2.2:38424.
After a few moments, lets kill the connection with ctrl+c and check our wireguard status:
^C
wg
interface: wg0
  public key: oS0mQplCAG4TYj6l9jbCZHn55e3tcyla6kPe4LvQHSA=
  private key: (hidden)
  listening port: 51820

peer: u3zlZTq7YJHnrfvnUPwh2riKVz0zdZs9ieAIq2S0vX8=
  endpoint: some.public.googlefi.ip:randomport
  allowed ips: 192.0.2.2/32
  latest handshake: 21 seconds ago
  transfer: 16.14 MiB received, 2.48 MiB sent
We can see much data has been transferred. Success!
Troubleshooting
Enable debugging
Lets enable debugging in the kernel so we can see journalctl messages:
modprobe wireguard && echo module wireguard +p > /sys/kernel/debug/dynamic_debug/control
Follow any wireguard messages:
journalctl -f -g wireguard.*
Handshake timeouts
Double check:
- firewall open ports
- router port forwarding
- public keys are correct
- allowed_ips are correct
Verifying MTU
To verify your set MTU is not too big for your particular network setup try pinging a Google nameserver:
ping 8.8.8.8 -s 1420 -M probe
1428 bytes from 8.8.8.8: icmp_seq=1 ttl=116 time=15.7 ms
1428 bytes from 8.8.8.8: icmp_seq=2 ttl=116 time=14.3 ms
1428 bytes from 8.8.8.8: icmp_seq=3 ttl=116 time=12.8 ms
where the -s option is your set MTU size.
References
- https://www.wireguard.com/
- https://docs.redhat.com/en/documentation/red_hat_enterprise_linux/9/html/configuring_and_managing_networking/assembly_setting-up-a-wireguard-vpn_configuring-and-managing-networking
- https://wiki.archlinux.org/title/WireGuard
- https://blogs.gnome.org/thaller/2019/03/15/wireguard-in-networkmanager/