Chromebook Peer Setup
Chromebook Peer Setup
Chromebook has its own native VPN software that is a little less-than-intuitive.
Before proceeding, I would recommend having the Chromebook connected to the local network and to SSH into the Homelab.
This way you can quickly cat /etc/wireguard/$HOSTNAME.public.key in the SSH terminal and copy/paste the key into the VPN UI described below.
This avoids any tedious and potentially inaccurate typing.
ssh homelab.local.network
sudo -s
cat /etc/wireguard/$HOSTNAME.public.key
oS0mQplCAG4TYj6l9jbCZHn55e3tcyla6kPe4LvQHSA=
VPN Configuration
To access the VPN settings:
- click the time at the bottom-right
- the gearbox for settings interface
- then the "Network" option on the left sidebar
- "add connection" -> "add built-in VPN..."
We are now presented with a form, that has a very specific validation algorithm before the "Connect" button will enable and turn blue.
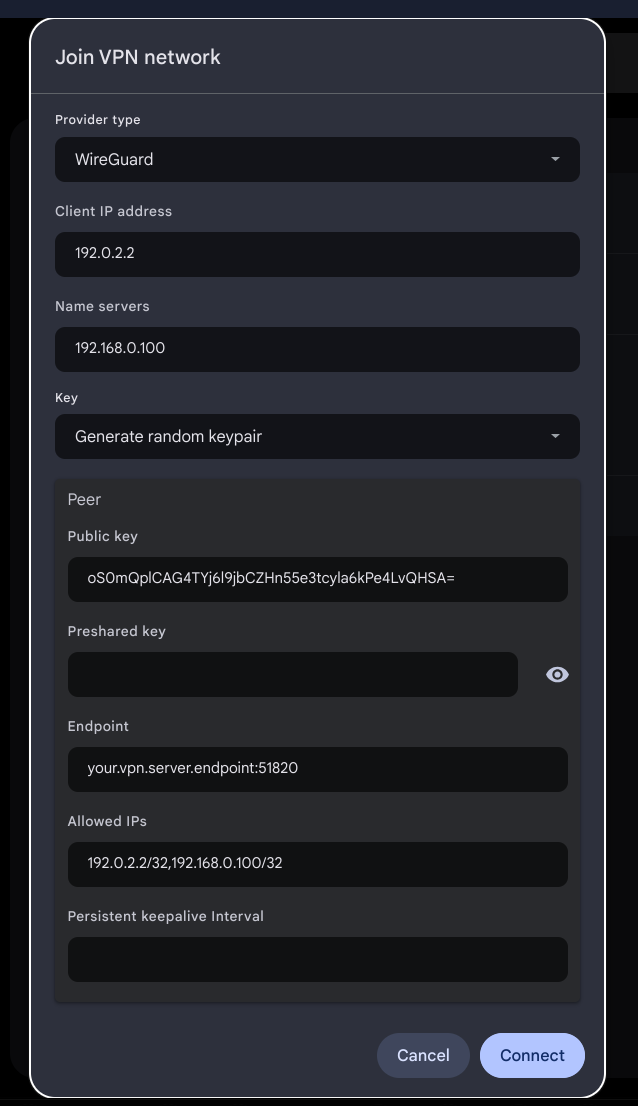
Settings:
Service Name:  Homelab VPN
Provider type: Wireguard
Client IP Address:  192.0.2.2

`# The address of our Homelab's PiHole DNS server on the local network.`
Name servers:  192.168.0.100


`# The Chromebook's public key will be available in the connection's settings after it is saved`
Key:  Generate random keypair

Peer

`# Utilize the cat /etc/wireguard/$HOSTNAME.public.key from your SSH terminal and copy/paste here`
Public Key:  oS0mQplCAG4TYj6l9jbCZHn55e3tcyla6kPe4LvQHSA=

`# Optional. Leave blank unless higher security desired.  See wireguard documentation.`
`# After saving, ChromeOS appears to autofill this field, masked by astericks, `
`# but it does not seem to make a difference.`
Preshared Key:

`# This will be your public facing IP address or FQDN, with the listening port `
`# (51820 in our example)`
Endpoint:  your.vpn.server.endpoint:51820

`# This field specifies addresses assigned to communicate TO and FROM our wireguard peer`
`# (in our case, the server)`
`#  A subnet mask is required for the form to validate and enable the Connect button.`
`#  We use /32 to designate one specific address`
`#  We assign the servers VPN address (192.0.2.2) and our PiHole DNS address (192.168.0.100).`
`#  Without the PiHole address, our Chromebook won't be able to access the nameserver.`
Allowed IPs: 192.0.2.2/32,192.168.0.100/32

`# Optional.  Specify number in seconds to send keepalive packets if your network requires it.`
Persistent keepalive Interval:
The Connect button should now enable and turn blue. Go ahead and click it to save the connection.
Add Peer to Server config
Unfortunately as of this writing we cannot use nmcli to add peers to our wireguard profile ( issue #358 ). So we will need to manually edit the config file and refresh the profile.
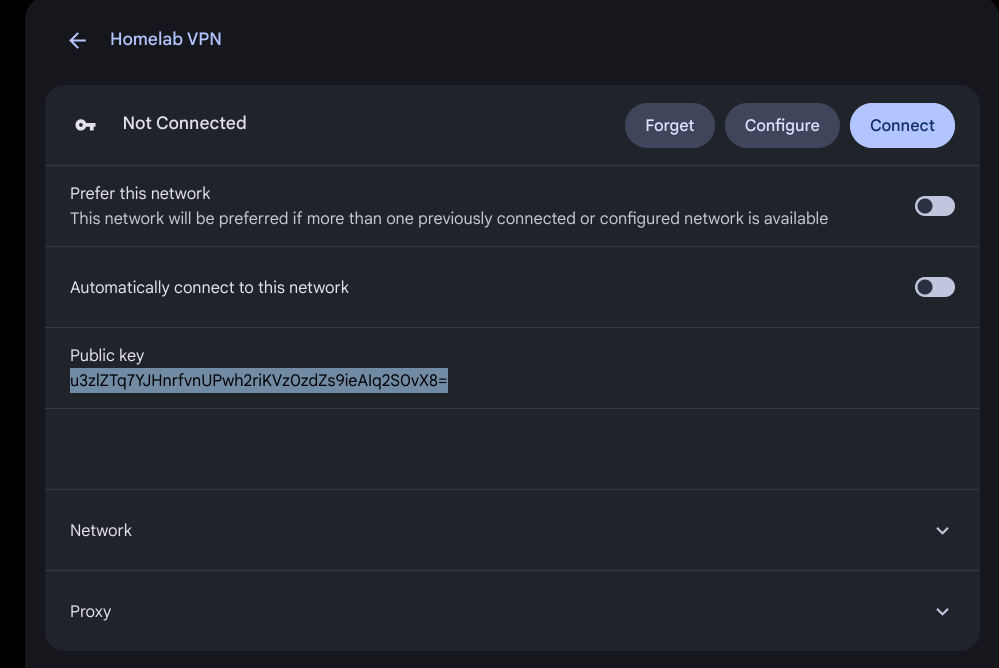
Lets utilize the copy/paste function of our Chromebook's public key. Go ahead and click on the newly created Homelab VPN connection.
You will be presented with the public key in the VPN's profile page. Copy it:
SSH into our Homelab and append our newly created peer to the wireguard profile:
ssh homelab.local.network
sudo -s
cat >> /etc/NetworkManager/system-connections/server-wg0.nmconnection << EOF

[wireguard-peer.u3zlZTq7YJHnrfvnUPwh2riKVz0zdZs9ieAIq2S0vX8=]
# chromebook
allowed-ips=192.0.2.2/32;
EOF
And now we set the profile to autoconnect, reload the profile and start the wireguard VPN:
nmcli connection modify server-wg0 autoconnect yes
nmcli connection reload
nmcli connection up server-wg0
Connection successfully activated (D-Bus active path: /org/freedesktop/NetworkManager/ActiveConnection/30)